

Homebrew Gadgets
Homebrewing is a great way to experiment, have fun and get your friends to tell you stories that they may not otherwise tell you. As I became a more advanced homebrewer, there were certain gadgets that I found that improved my brewing and some that frankly made things more stressful. Here are some of the more useful homebrew gadgets that I have come across.
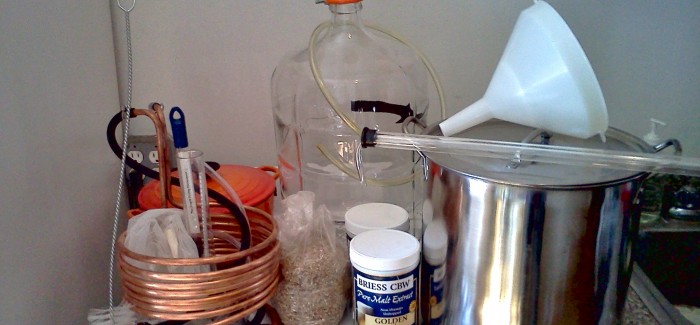
Hop Spider. When your homebrew store is out of your favorite Amarillo pellets but they have a few ounces in leaf form, what do you do? Well whether you prefer to use pellets, plug, whole or leaf hops, the hop spider can be your first barrier against organic hop matter continuing on into your fermenter. $10 at Home Depot will get you everything you need (assuming you have a drill at home) Start out with a 3 foot piece of 1/4″ galvanized all-thread, a 4 inch PVC coupling, a 5inch stainless steel adjustable hose clamp, a painters straining bag and 6 1/4″ nuts and you’re set. Cut the all-thread into three equal lengths with your trustiest hack saw and drill 5/16″ holes in a triangular pattern around the PVC coupling. Secure the all-thread rods to the holes drilled in the PVC by tightening two nuts on either side of the PVC ring. Make sure that the inside of the ring has as little all-thread exposed as possible. Wrap the painter’s strainer bag around the PVC coupling and secure with the hose clamp. To get an idea of how to build one peep this DIY YouTube video: http://www.youtube.com/watch?v=XLfPYSyRGl0
The Sanke Fermenter. When I decided that brewing 5 gallons of beer at a time just wasn’t going 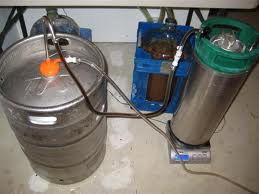 to quench my insatiable thirst, the obvious answer was “bigger is better.” I began making 10 gallon batches of homebrew but needed a way to ferment the bigger batches effectively. While my 6 gallon carboys were great and allowed me to try two different yeast strains or different dry-hopping in the same base wort, it still meant that I had to clean and sanitize 2 vessels. Enter the sanke fermenter. Take an old 1/2 barrel party keg and remove the locking ring, valve, and spear (diptube) from the keg. There is now a nice 2 inch opening at the top of your 15.5 gallon fermenter. The orange carboy caps are a snug fit but with a little warm sanitizer, they can be coaxed onto the opening rather easily. Plug one size of the carboy cap and attach your airlock or blow-off tube to the other size just as you would with your carboy. Having a stainless steel fermenter proves nice for a lot of reasons. If you really want to deep clean and sanitize the keg, just fill the keg with water and boil it right on your gas burner. The steam caused from a small amount of boiling water will get into all the nooks and crannies in the keg and kill anything in sight. Just make sure that you give the keg time to cool down before filling it with wort. I did this for a while and then realized how much I would rather not lift a keg filled with 10 gallons of beer high enough to gravity feed my bottling bucket or keg. I figured out that a 3/8 inch racking cane fits snugly through the center penetration through the carboy cap. This allows me to pressurize the keg with CO2 when fermentation is completed and transfer the beer into a bottling bucket or keg with CO2 pressure. I’m sure my back will thank me for this one in 20 years.
Fermentation Temperature Controller. The last of my favorite gadgets, but easily the best for improving the quality of your beer, is most definitely the fermentation temperature controller. I start out with your typical keg tub that you store party kegs in and fill with ice. I keep my fermenters in the basement where I have the most consistent temperatures. Once I have wort in my carboy or Sanke Fermenter, I place the fermenter inside of the keg tub. This leaves ~3 inch interstitial space between the walls of the fermenter and the walls of the keg tub. I then fill the interstitial space with water that matches my desired fermentation temperature. I’m lucking in Colorado that my basement stays at or below my desired fermentation temperature all year around, but even if not, the additional liquid just adds more thermal mass to the system and prevents large temperature swings quickly. If the ambient conditions are a little colder than your desired fermentation temperature, heat up the water surrounding your fermenter with a cheap aquarium heater. If the ambient temperature of your fermenting area is generally warmer than your desired fermentation temperature, freeze a few plastic water bottles ahead of time and add them to the interstitial water bath as needed to maintain your fermentation temperature. If controlled well, the temperature of the water surrounding your fermenter will be very close in temperature to your fermenting wort.
Try any of the above homebrew gadgets for fun or for function. These are all tricks that I have come upon one way or another and use all three of these items in nearly every batch of homebrew that I make. Happy Homebrewing!
Related Posts
Homebrewing Recipe | The Homebrewer’s Spice Rack (Inspired by Scratch Brew... January 15, 2018 | Scott Johnson

Living the Dream | Making a Beer Store a Reality... May 22, 2015 | Stacey Goers

New Samuel Adams LongShot American Homebrew Contest will Award “Brewership” ... July 6, 2017 | Mathew Powers

AHA Learn to Homebrew Day October 31, 2013 | Philip Joyce

Submit a Comment