

Homebrew 101 – Equipment and Prepping to Brew
Most people know how to cook. In fact a lot of people excel at this skill, but if asked if they could make a drink from scratch using raw ingredients, most would pass. Well never fear fellow beer lovers, beer is no harder to make at home than Ramen. With some basic equipment, patience, and curiosity, you can make some amazing beers at home. First up in the series: Equipment & Sanitation
In order to make beer, there are some items that are must haves, and quite a few items that are optional but will make life easier if you have them, most of which come in handy during fermentation and bottling. Once you have the basics down, you can then explore into some equipment for more advanced brewing, but we will cover those when we reach that part of the series.
Must-haves to brew:
- A large pot – must be able to hold 3 gallons at a minimum. 5 gallon capacity is better. Preferably stainless steel
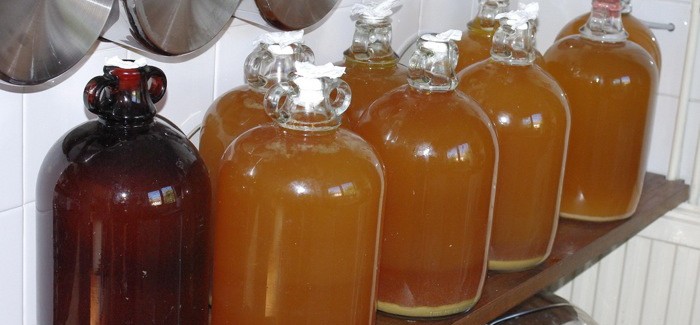
- A 5 or 6 gallon glass carboy (A large water-jug looking thing)
- A strainer
- A large spoon – I prefer wooden, but any heat-resistant material will do
- A carboy airlock – lets CO2 out of your fermenter, keeps Oxygen from entering
- A large funnel
- PBW Brewers washing chemical – alkali chemical used widely by the brewing industry
- Star San Sanitizer
So what do you need all of these things for? Obviously the pot will be used to boil your wort (unfermented beer). Very simple batches can do this with 2 gallons of water, but you need enough room to allow for some boil-overs. Brewing beer can be like pasta with starches getting overly active and rise up the pot and over – especially if you use a lid. Stainless steel is a preferred metal because it won’t stain and leach flavors into your beer.
The carboy is the vessel that you will ferment in. Most homebrew recipes yield 5 gallons. Like the pot, you need a little extra room on top for when the yeast get active. There are a few types of airlocks – stopper type, cap-looking types, all with a small plastic piece that are filled with water that lets bubbles out when they occurs without allowing new outside air in – it creates a closed system.
You will use the spoon to stir your wort during the boil and the strainer to remove any solids, such as hops, when transferring into the carboy, which is also where the funnel comes in handy. You will want to choose a funnel with a large spout to allow liquid to flow quickly, otherwise it will take you a long time to transfer 2-5 gallons!
Perhaps the most important process in homebrewing is staying clean. Unsanitary equipment can lead to off flavors, ruined batches, and a lot of frustration. Cleaning your equipment is a three step process. As Homer Simpson famously once said, “Lather, rinse, repeat. Always repeat”. It’s really a lot like that.
When purchasing your equipment, it is likely cheapest to buy a kit of some sort. From my experience, these kits include what you need with some extras that you may or may not need. For the items you don’t need right away, you can always buy them later, but it will cost you more overall to do it piecemeal. Support your local homebrew shop- you will likely get to know these people and they will appreciate you supporting their local business, even if it costs you a few dollars more than going the online route.
First you will clean everything, and I mean everything, with your PBW. PBW is like using dawn on your dishes. It gets all of the solids and stuck on stuff off of your equipment without leaving behind soapy residue. You mix 1/4 cup with warm water in a large bucket with anything that will touch your brew. You will also need to clean your carboy our with this, which can sometimes take some transferring form one vessel to another. PBW needs 30 minutes to do its magic, followed by a good rinse.
After you have cleaned everything with PBW and rinsed it all, you need to sanitize your equipment. This is where the Star San comes in. Some homebrewers will tell you that you can use a mild water-bleach solution, which will work fine, but I find it too harsh and am afraid some of it will get left behind in the brew- which could kill off your yeast and lead to off flavors, which defeats the purpose of making your own beer in the first place. Like with PBW, Star San is mixed with water – 1 oz of santizer per 5 gallons of water. It needs 5 minutes to do its work, after which you do not rinse. When emptying Star San from a jug- like vessel, such as your car boy, it is important not to let it “glug” as it will bubble and which leaves more sanitzer behind than you want.
You are now ready to brew! Stay tuned for the next part of our series- Performing your first brew.
Justin Hatfield is the founder of the Denver Draughters Homebrew club. You can join them here. He is also the founder of the Colorado Brewery Meetup.
Related Posts
Judging and Understanding Award-Winning Beers as a Homebrewer... September 1, 2016 | Scott Johnson
Viking Age Brew: An Interview with Mika Laitinen... July 26, 2019 | David Nilsen
AleBlazers Series | Q&A with Sarah Flora of Flora Brewing... June 21, 2022 | Emma Wargolet
Learn to Homebrew Day is November 2 October 24, 2019 | Jadon Flores

Submit a Comment